Complete WalletConnect DApp Connection Tutorial

What is WalletConnect and Why Cold Wallet Users Need It
Imagine you've set up an ArcSign USB cold wallet. Your private key is safe and sound on the USB, out of reach from hackers and malicious code. Great! But now you face a new challenge: how do you interact with DApps without exposing your private key?
Traditional hot wallets like MetaMask store your private key directly in the browser. The browser extension can access it anytime to sign transactions. Convenient, yes—but also risky. If the browser gets compromised or a website is malicious, your assets are at risk.
WalletConnect solves this with a third approach: remote signing protocol. The core idea is this: DApps don't need your private key. They send a signing request to your wallet app (ArcSign), you verify the transaction details on your own device, approve it, and ArcSign sends back a signature. Throughout this entire process, the DApp never sees your private key.
ArcSign supports the latest WalletConnect v2 protocol. Compared to the older version, v2 offers better security, lower latency, and a clearer transaction approval flow. If you find a DApp that only supports v1, we recommend requesting an upgrade.
How ArcSign Implements WalletConnect v2
ArcSign's WalletConnect implementation works in multiple layers:
Connection Layer
When you scan a WalletConnect QR code from a DApp, ArcSign establishes an encrypted channel with the DApp. The channel passes through WalletConnect's relay server, but the relay server cannot decrypt any messages because both sides use public-key cryptography for end-to-end encryption.
Transaction Signing Layer
When a DApp requests a signature, ArcSign:
- Verifies the request comes from an approved DApp
- Decodes the transaction details (recipient address, amount, gas fee), and displays them
- Asks you to enter your wallet password for confirmation
- Uses your private key to sign the transaction (signing happens locally, key never leaves USB)
- Sends the signature back to the DApp, which broadcasts it to the blockchain
Security Isolation Layer
Even if a DApp website is compromised or contains malicious code, it cannot:
- Steal your private key (it's on USB, not in the browser)
- Sign unapproved transactions (signing requires manual confirmation in ArcSign)
- Modify transaction details (you see the actual transaction in ArcSign)
Step-by-Step Tutorial: Connecting to a DApp
Let's walk through connecting to Uniswap (a DEX) as an example. This process applies to any DApp supporting WalletConnect.
First, launch ArcSign on your computer and make sure your USB is plugged in. ArcSign should display a "USB Connected" indicator. If not, try unplugging and reinserting the USB.
With USB confirmed, ArcSign will show the main dashboard. You should see your wallet balance (assuming your Provider is configured correctly). This confirms ArcSign is ready to sign transactions.
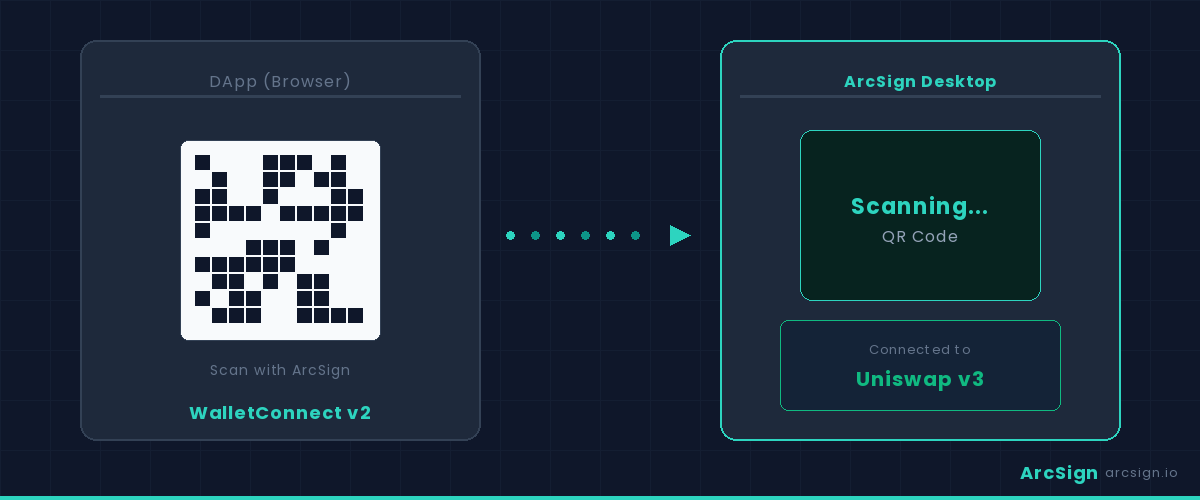
Open your browser and navigate to Uniswap.org (or any DApp supporting WalletConnect). Click the "Connect Wallet" button. You'll see a wallet selection list including MetaMask, WalletConnect, and others.
Select WalletConnect. Do not select MetaMask—that's for hot wallets.
Uniswap will display a QR code. This QR code contains a special URI (Uniform Resource Identifier) to establish the WalletConnect connection. You have two options:
Option A: Scan the QR Code (Recommended)
In ArcSign, find the WalletConnect scanning option and use ArcSign's camera to scan the QR code displayed on Uniswap. This is the most convenient and safest method because you fully control what you're scanning.
Option B: Manually Paste the URI
If ArcSign's scan doesn't work, click "Copy to Clipboard" below the QR code on Uniswap, then find the "Paste URI" option in ArcSign's WalletConnect section and paste the connection string.
After scanning or pasting the URI, ArcSign displays a connection request dialog saying "Uniswap wants to connect to your wallet." The dialog shows:
- The DApp name and icon (Uniswap)
- Requested permissions (typically "view address" and "sign transactions")
- Connected network (Ethereum, Polygon, etc.)
Review this information carefully. Once you confirm you want to connect to this DApp on this network, click "Approve" or "Connect".
Malicious websites can fake a DApp's name and icon. Before approving, check the URL in your browser's address bar. Uniswap's official URL should be https://app.uniswap.org, not uniswap.fake.site or similar.
Once approved, Uniswap displays "Wallet connected" and shows your wallet address and balance. In ArcSign, you'll see "WalletConnect: Connected" status.
At this point, Uniswap knows your address but has never seen your private key. This is the beauty of WalletConnect.
Now that you're connected, you can trade on Uniswap. For example, let's say you want to swap ETH for USDC. On Uniswap:
- In the "From" field, select ETH and enter an amount (e.g., 1 ETH)
- In the "To" field, select USDC
- Review the exchange rate and expected USDC amount
- Click "Swap"
Uniswap calculates the required gas fee and displays the final transaction details.
When you click "Swap", Uniswap sends a signing request through WalletConnect to ArcSign. ArcSign immediately shows a dialog with the complete transaction details:
- Sender address (your address)
- Recipient address (Uniswap's smart contract)
- Transfer amount and token (1 ETH)
- Gas limit and gas price
- Total transaction fee (gas cost in USD)
This is your last chance to verify the transaction. Confirm all details are correct—especially the recipient address and transfer amount.
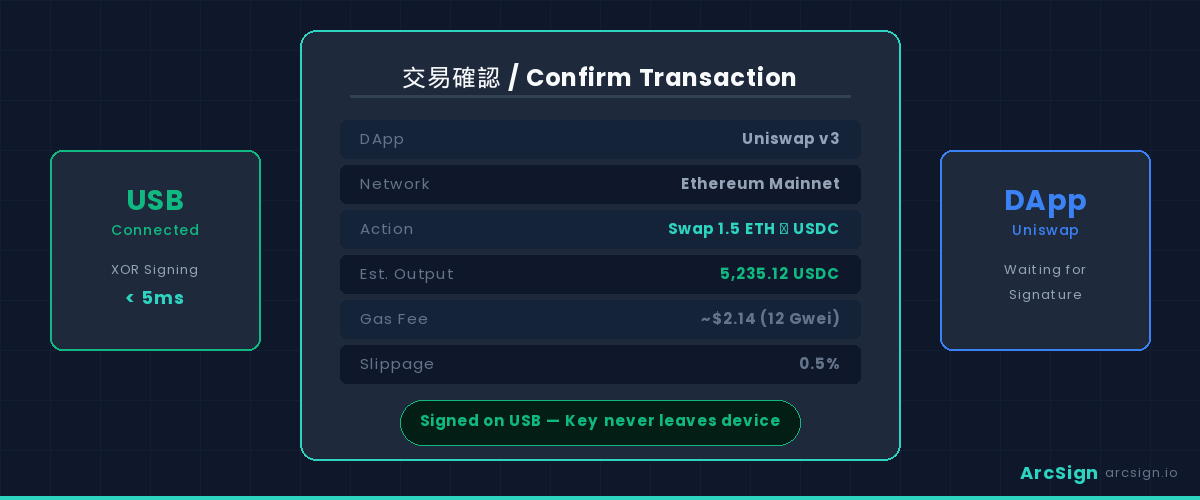
After reviewing transaction details, ArcSign prompts you to enter your wallet password. This is the password you created when setting up your ArcSign wallet. The password ensures only you can sign transactions.
With the correct password, ArcSign uses your private key on the USB to sign the transaction. The entire signing process happens locally on your computer in under 1 second. After signing, the private key is immediately zeroed and destroyed.
Once signed, ArcSign sends the signed transaction back to Uniswap. Uniswap broadcasts it to the Ethereum blockchain. You'll see the transaction status on Uniswap change from "Processing" to "Completed" (or failed, if there was an issue).
If successful, within a few seconds your ArcSign balance updates—ETH decreases, USDC increases. You can also search for your transaction hash on Etherscan (the blockchain explorer) to see the detailed on-chain record.
Supported DApps and Blockchains
Any DApp implementing WalletConnect v2 works with ArcSign. Here are some popular examples:
| DApp Category | Examples | Purpose |
|---|---|---|
| DEX (Decentralized Exchange) | Uniswap v3, SushiSwap, Curve | Token swaps, liquidity mining |
| NFT Marketplace | OpenSea, Blur, LooksRare | Buy, sell, trade NFTs |
| DeFi Protocols | Aave, Compound, MakerDAO | Lending, borrowing, derivatives |
| Staking & Yield Farming | Lido, Curve, Convex | Earn rewards |
| Cross-Chain Bridges | Stargate, Across, Relay | Transfer assets between chains |
Supported Blockchains
ArcSign supports 22 blockchains, including:
- Layer 1: Bitcoin, Ethereum, BNB Chain, Polygon, Avalanche, Arbitrum, Optimism, Base, and more
- Connectivity: All EVM-compatible chains connect through WalletConnect v2 to various DApps
When connecting to a DApp, ensure ArcSign and the DApp use the same blockchain. If ArcSign is on Ethereum but Uniswap switches to Polygon, your transaction may fail or behave unexpectedly. DApps typically show the current network in the top right corner; ArcSign clearly indicates it in connection requests.
Security Benefits: Why Cold Storage Signing is Safer
You might ask: if I need to enter a password in ArcSign to sign, why not just use MetaMask? The answer is security. Let's compare:
MetaMask (Hot Wallet) Flow
- Your private key lives in the browser
- When a DApp loads, MetaMask automatically has access to your key
- If the website has malicious code (or is compromised), that code can steal your key or sign arbitrary transactions
- MetaMask has safety checks, but they can't prevent all attacks
ArcSign + WalletConnect (Cold Storage) Flow
- Your private key lives on an offline USB, not in the browser
- A DApp website has zero access to the USB or ArcSign's key
- Even if the website is compromised, malicious code cannot sign transactions—signing requires manual password confirmation in ArcSign
- You always see the exact transaction details in ArcSign's confirmation dialog, preventing deception
Real Attack Scenario
Scenario: Fake Uniswap Clone Website
An attacker creates a fake Uniswap website with identical appearance. You accidentally visit it and want to swap 1 ETH.
With MetaMask: The fake site steals your private key from the browser, or creates a phony signing request that MetaMask approves, transferring all your assets to the attacker's address. You never see the actual recipient address.
With ArcSign + WalletConnect: The fake site tries to establish a WalletConnect connection. Assume it succeeds and requests you sign a transaction sending 1 ETH to the attacker. But in ArcSign's signing confirmation dialog, you clearly see "Send to 0xattacker..." not Uniswap's contract. You recognize the attack and refuse to sign. Your assets remain safe.
However, cold storage cannot protect you from your own carelessness. If you actively approve a malicious transaction (e.g., accidentally click "Confirm" in the signing dialog), even cold storage can't help. So always carefully review transaction details before signing.
Troubleshooting Common Issues
Issue 1: QR Code Scan Not Working
If ArcSign can't scan Uniswap's QR code, try:
- Ensure your computer's camera permissions are enabled for ArcSign
- Use the "Paste URI" method instead of scanning
- Confirm the QR code is clearly visible and unobstructed
- Refresh the Uniswap page and regenerate the QR code
Issue 2: Connection Request Timeout
If ArcSign shows "Connection timeout":
- Verify your internet connection is stable
- Check if WalletConnect relay servers are operational (visit
https://status.walletconnect.org) - Try a different browser or clear your browser cache
- Restart the ArcSign application
Issue 3: Transaction Signing Failed
If signing returns an error:
- Verify you entered the correct password
- Check that your USB connection is stable (try unplugging and replugging)
- Confirm ArcSign's network selection matches the DApp
- Ensure your account has enough balance to pay gas fees
Issue 4: DApp Shows "Signing Rejected"
If the DApp says you rejected the signing request:
- Check if ArcSign has a pending signing dialog you accidentally closed
- Retry the transaction in ArcSign
- Some DApps require resubmission if the signing request expires (typically 30 seconds)
FAQ
Can I connect to multiple DApps simultaneously?
Yes. ArcSign supports multiple WalletConnect sessions. You can connect to Uniswap and OpenSea at the same time, switching between them without disconnecting and reconnecting.
Does a WalletConnect connection stay active forever?
No. WalletConnect sessions expire (typically after 7 days). After expiration, you need to rescan the QR code or paste the URI to reconnect. You can also manually disconnect in ArcSign.
Can the DApp see my USB or password?
Absolutely not. The DApp only knows your wallet address. It cannot see your USB, doesn't know your password, and has no access to your private key. WalletConnect is a signing protocol, not a data-access protocol.
What if my computer is hacked?
Even if your computer is compromised, attackers cannot steal your private key (it's on the USB). They might see your DApp interactions, but they cannot sign transactions—that requires your ArcSign password. As long as your USB and password are safe, your assets are safe.
Is WalletConnect safer than pasting my private key into a website?
Absolutely. Never ever paste your private key or seed phrase into any website, even reputable-looking DApps. WalletConnect lets you sign transactions without exposing your key—that's the right way.
Ready to Trade Securely with Cold Storage?
ArcSign supports free WalletConnect DApp connections. Pro users enjoy token approval management, best-route DEX swaps, and batch operations.
Download ArcSign Free → Try Pro